Print
New Quality Assurance Request

The eLearning module will open in a new internet window.
- How to send a Quality Assurance request email (Duration = 27 minutes).
To send a request via email that a case is ready to be quality checked, follow the steps below.
- Sign into eCase. Refer to the How to Sign into eCase section.
- Go to your Workbasket and click on the Manage link in the Actions column, for the case that you would like to request a Quality Assurance (QA) for.
- Click on the Contributions/QA (0) link on the left menu. The Contributions & Quality Assurance screen appears.
- Click on the New Quality Assurance Request button. The New Quality Assurance Request pop up window appears.
- From the Type
drop down select the person/area of where you would like the QA request to go.

TIP anyone who has the Receive Peer Review QAs privilege on their user account, will be able to conduct a Peer Review. Anyone with the Receive Information Rights Unit QAs privilege on their user account will appear under the Information Rights Unit type, and anyone with the Receive Press Office QAs privilege on their user account will appear under the Press Office type. - In the Address Replies To/Send From field, you have the option to select an email you would like to send the QA email from. Your email address will appear along with any emails that have been entered in Mailboxes using a Mailbox Type of Send On Behalf Of for the team associated to the case or at a team higher in the organisation structure hierarchy.
NOTE if there are no additional emails set up in Mailboxes, your email will be pre-populated in the Address Replies To/Send From field. - Once the Type is selected, recipients will appear in the drop down section of the Recipients area. Select one recipient who you would like to QA the case.
If you would like to send the QA request to someone who is not registered on eCase, type in their email address in the Recipients field and select the email from the green Email to field. - Optional: If you have multiple email templates created in eCase for requesting a QA, then the Email Template field will appear. Select the relevant email by clicking on the drop down arrow in the Email Template field. Review the text of the emails in the Body section.
- The
Subject is the title of the email
and can be edited using the
Edit Subject link.
NOTE the Subject, title of the email, comes from the Standard Quality Assurance Request email template. - Modify the Body
of the email if required.
NOTE the standard Body text of the email comes from the Standard Quality Assurance Request email template.
If you have manually entered an email address rather than selecting a team member from eCase, some of the mail merge fields will not be available to use, for example Case_Hyperlink. The QA request will need to include all of the documentation relevant to the case, for the individual to respond to the QA. - Attach Case Files
to the request. Place a tick in the
tick box next to each relevant document.
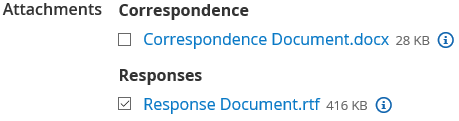
- Select the Due Date of the QA request by using the calendar icon.
- Preview
the email request by clicking on the
Preview/Send Email button.
NOTE if the recipient, or one of the recipients on the QA request, has the PDF Preference set to On, then any ODT documents attached to the QA request will be converted to a PDF document. Both document types will be attached to the QA email.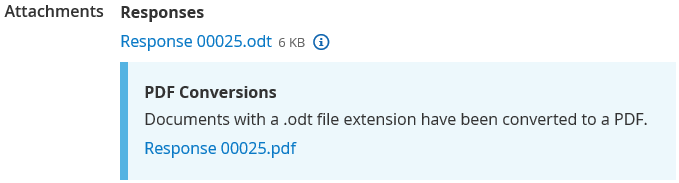
- If all of the details are correct, click on the Send button.
If you need to amend any of the details, click on the
Back link.
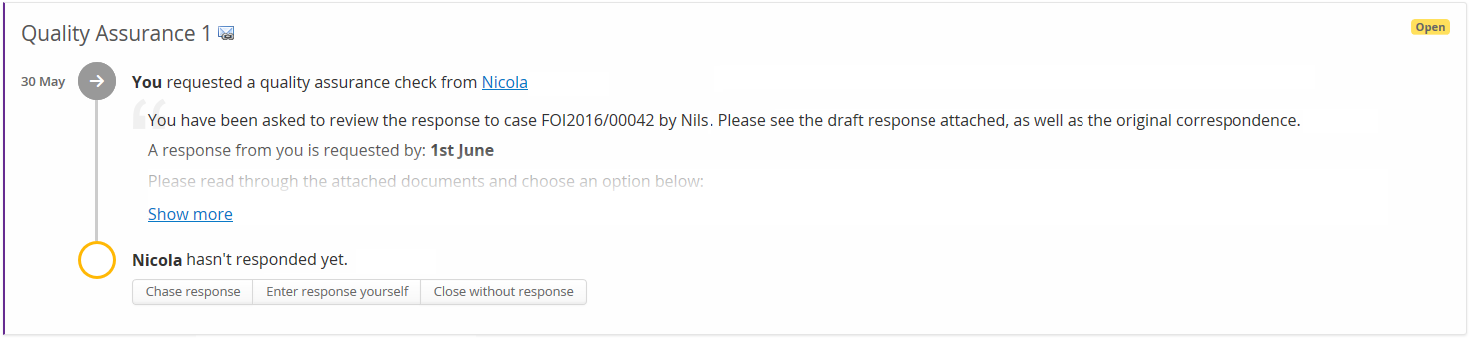
1. Chase response – send an email to the QA person to chase the information requested.
2. Enter response yourself – enter the information directly into eCase if you have received it via another method.
3. Close without response – close the QA request without adding in a response.