Print
Enter response yourself
If the QA person has sent you the required information via email or has called you with the response, then you can enter the information into eCase yourself.

The eLearning module will open in a new internet window.
- How to close a Quality Assurance request yourself using the Enter Response Yourself button (Duration = 18 minutes).
To do this, follow the steps below.
- Click on the Enter response yourself button. The Enter Response pop up window appears.
- Select the Outcome from the drop down arrow.

The outcome can be:
· Accepted – the case details and response has been accepted so the case can be closed.
· Rejected – the case cannot be closed. Updates will be required.
If you… Then… Select Accepted No additional fields appear on the Enter Response screen. Select Accepted with Comments Enter the comments you have received from the QA person into the Referral Response area. Select Rejected Select the reason for the reject by placing a tick in the tick box of one or more of the Reject reasons. 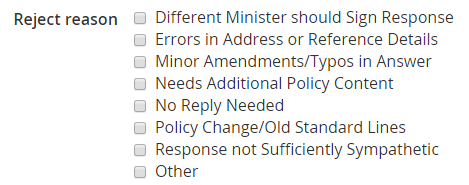
Enter comments in the Referral Response field. - Select the Response Date of the contribution request by using the calendar icon.
- Attach any QA correspondence to the response using the Choose file... link, or drag and drop a file in the Attachments area.
- Click on the Close Quality Assurance button.
Accepted


A message appears to indicate that the QA has been closed. - If you would like to use the attached document as a response document, click on the drop down arrow that is next to the document and select the Set as response document link.

- Click on the OK button if you would like to set the document as a response document. The drop down link changes to a Response document icon. This indicates that the document attached to the contribution has been selected to be a response document for the case.
