Print
How to create a Complaint Case
To manually create a complaints case, the first step is to enter all of the case details.
Follow the steps below to manually create a case.
- Sign into eCase. Refer to the How to Sign into eCase section.
- Select the New Case button on the eCase menu. The Case Details screen appears. This is where you can select the type of request the correspondent has sent in.
- Select the Case Type
from the drop down menu:
- COM – Complaint
- NCOM – Non-complaint - Complete the Case
Detail information.
Field Description Case Title Enter a summary of the case. Team Leave the Team field blank. NOTE the process is to assign a case reference number prior to allocating the case to a team. See Awaiting Allocation. Key Terms Select one or more key terms that are relevant to the Complaint. Key Terms are used to identify Complaints that might be linked to this case, or provide standard line responses. Date Received Enter the date the correspondence was received. The case clock will start the next business day and will calculate the response due date (target date). Correspondence Date Enter the date the correspondence was sent. Correspondence Ref Optional: Enter a reference if one was provided. Correspondence Method Select how the correspondence was sent in – Email or Letter. Reply Preference Select how the reply is to be sent – Email or Letter. Correspondence Description Enter in the wording of the Complaint correspondence. Handling Instructions Optional: Enter instructions on how to handle the case. - Complete the Correspondent
Details.
If the correspondence has come in via a letter, the Address, Postcode and the Correspondent Group fields are mandatory. All other fields are optional.
If the correspondence has come in via email, the Email Address and the Correspondent Group fields are mandatory.
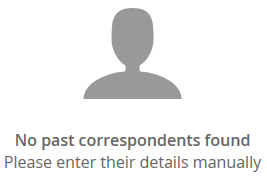
When you type in a partial or full email address, or two or more of the correspondent details, the finding past correspondent function will automatically search eCase for matching details. These will appear in correspondent cards on the right side of the screen. The correspondent card will include the number of cases the correspondent has sent in, how many are open cases, along with a link to the last received case and the number of days, months or years since it was received. Review the details and if a correspondent card matches, click on the Select link.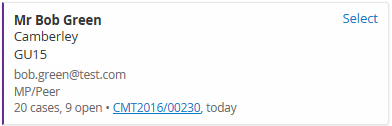
- In
the Case Documents area, attach any
documentation that has come in from the correspondent, for example, a copy of
the complaint letter that has been sent in.
Use the Attach new files... button, or drag and drop a file in to the Case Documents area. - The Attach New Files window opens where you can classify the type of document you are uploading to the case. Use the Correspondence Document type. NOTE Add additional documents if required using the Add more files… button.
- Optional: Add in a description for the document and click on the Attach files to case button.
- Add any Standard Lines that match the details of the case. See the How to add Standard Lines section.TIP Standard Lines are lines of prepared text which can be used as part of a response to a correspondent. They can either be entered as a text line/paragraph or as a whole template document, like a pre-prepared letter. They automatically appear based on the Key Terms assigned to the case, or can be manually selected by clicking on the search all standard lines link. NOTE Standard Lines are optional and can also be added during the Prepare a Response stage of the process.
- Optional:
- Review Linked Cases to see if any cases on eCase are related to the new case.
- Add in anyone that needs to Watch This Case.
- Add any Mandatory Clearances.