Print
How to create a case via email
If a request is sent via email, a quick way to create a new case is to forward the email to new.case@your-eCase
TIP If you send the email from your own eCase email address, the case will appear in your Workbasket.
To create the case details, follow the steps below.
- Sign into eCase. Refer to the How to Sign into eCase section.
- In your Workbasket, a case will appear with the following descriptions.

Field Description Case Ref Not yet allocated Case Type/ Case Title Email Correspondence / Subject of the correspondents email Correspondent No information entered Status / Due Date No information entered Information Create Case Actions Resume - Click on the Resume link and select the relevant Case Type from the drop down.
The advantage of forwarding the correspondents email into eCase is that some of the fields will automatically be completed, in the Case Details screen, from the email details. - Complete the remaining Case Detail information.
- Complete the Correspondent Details. The Email Address and Correspondent Group are mandatory.
All the other fields are optional.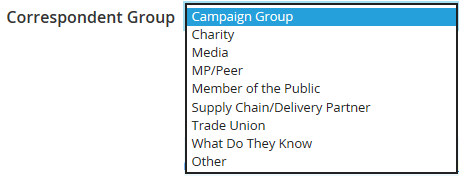
When you type in a partial or full email address, the finding past correspondents function will automatically search eCase for matching details. These will appear in correspondent cards on the right side of the screen. The correspondent card will include the number of cases the correspondent has sent in, how many are open cases, along with a link to the last received case and the number of days, months or years since it was received. Review the details and if a correspondent card matches, click on the Select link.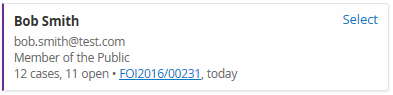
If no correspondents appear or match, the no past correspondents icon will appear. Enter the details in manually.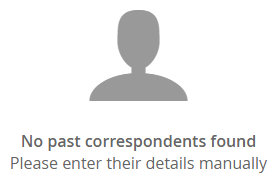
In the Case Documents area, the correspondents email has automatically been attached to the case. Attach additional files if required. - Add any Standard Lines that match the details of the case. Refer to the Add Standard Lines section.
- Optional:
- Review Linked Cases to see if any cases on eCase are related to the new case.
- Add in anyone that needs to Watch This Case.
- Add any Mandatory Clearances.