BEIS: What's new on eCase3
There are several new features and enhancements to eCase. What's new on eCase3 will provide you with a brief overview of the feature and additional links to expand your knowledge using relevant areas in eCase Help.
Contents
What is new with each Case Type?
Case Information
A new Case Information icon
BACK TO TOP
Case Reassign
There is a new dedicated link to enable you to reassign cases individually or in bulk. If you are a Hub coordinator or have the Search Screen Case Reassigner role on your user account, you will see the Case Reassign link. Go to the More menu, then under the Management section click on the Case Reassign link. You will still be able to reassign cases via the Case Search screen.
Find out more…
BACK TO TOP
Quick search
Find cases easily using the Quick search field. Enter two or more characters into the Quick search field and a list of cases with their description 
Find out more…
BACK TO TOP
Case Timeline
A timeline is available on the Case Details screen. It provides a visual of the key stages of the case.
Find out more…
BACK TO TOP
Close a case
Across all case types, the Close Case button is now available on the workflow tool bar rather than in the Response screen.
BACK TO TOP
Configure an email
You can now add an email to eCase that will be BCC’d into all of the response emails that are sent out of the system. The default email is set up in the email Configuration Options screen at the top level of the Organisation Structure. This can be configured for FOI case types (FOI: BCC All Response Emails To) and all other correspondence types (Correspondence: BCC All Response Emails To).
To add on the BCC email address, follow the steps in the How to add in email Configuration Options section.
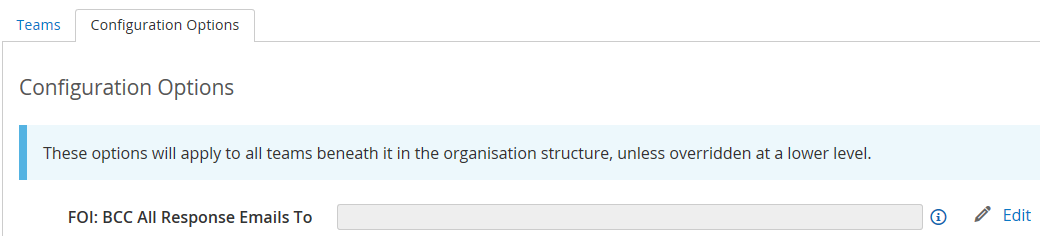
NOTE the BCC email address will only be available at the top level of the Organisation Structure.
BACK TO TOP
Contribution
The requests for Contributions and QAs are now accessed via a single link, Contributions/QA on the left menu. Once selected, you will see four new buttons in the Contributions & Quality Assurance screen. To access, click on the relevant buttons:
- New Contribution Request
- New Record-only Contribution
- New Quality Assurance Request
- New Record-only Quality Assurance
When a new contribution is requested, you have the option to select a contribution type. There are two new contribution types of:
- Request
for Draft
– where you are asking the contributor to draft the response to
the case.
- Request
for Information
– where you are asking for information to assist you in
drafting the response to the case.
Depending on what Type is selected, the wording on the email template will change. This can include mail merge fields that take the data from the Case Details screen. If there is more than one email template, you will see the Email Template field where you can select the template required. Review the email in the Body section to decide which template is appropriate.
NOTE These email templates are set up in the Email Templates section on the More menu, then Settings section. You will only see this section if you have the Email Templates role assigned to your user account.
The advantage of using these email templates is that the contributor can click on the respond link in the email and enter their response directly in eCase rather than replying to all on the email. If a document is attached to the contribution response, this will be available in the Documents section of the case.
In the Recipients field, you can select:
- A team – the contribution will be sent to all contributors set up on the system for the team selected. They will then have the option to view the contribution or take ownership of the contribution.
- Add multiple contributors on the same request. Rather than selecting the whole team, you can select specific recipients using the Recipients drop down arrow.
- Or, you can type in the recipients email address. When you start to type, the Email to field appears in green below the Recipients field. Select the Email to field when the email address has been fully entered.
NOTE if you type in the email address, the contribution email will not allow any links to view or access eCase.
When sending an email request, the process has changed so that you automatically preview the email prior to sending the email out.
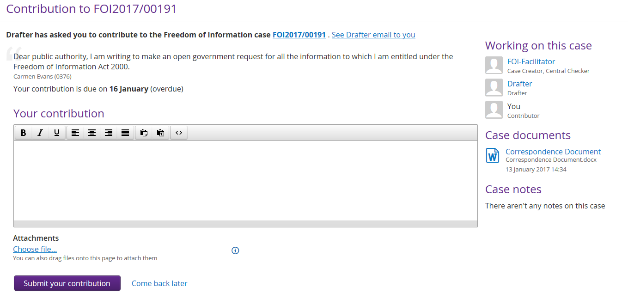
The contributor can respond via eCase using the quick contribution screen. This is accessed via the Respond to this contribution request link.
If the contributor enters their response via eCase, you can track who has completed their contribution. A completed contribution will have their response entered onto the contribution with a tick icon. The contributor that hasn’t responded via eCase will still state that they haven’t responded yet. Once complete, the contribution will automatically be closed and you will receive a message on your Workbasket.
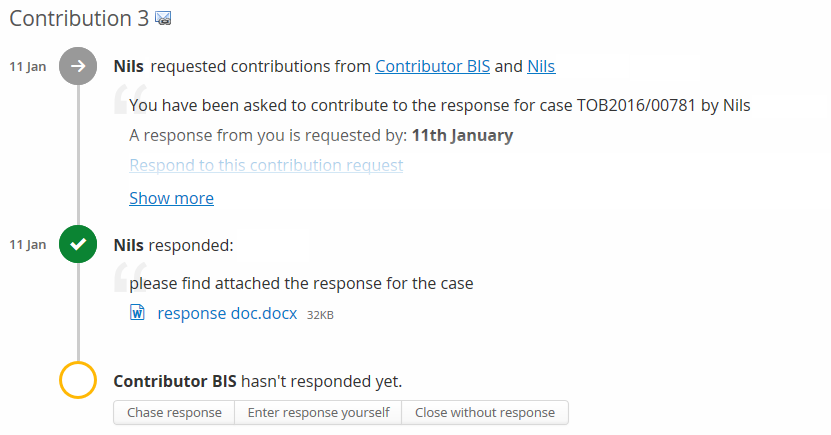
If the contributor uses the Reply to All on the email option, then the email will be attached to the relevant contribution as normal. The email will be available in the Documents section of the case. You can then use the Enter response yourself button to enter any additional details and close the contribution.
Find out more…
Contribute to a Case
Respond to a contribution
Reply to All from an email Contribution Request
Enter response yourself
BACK TO TOP
Correspondent Details
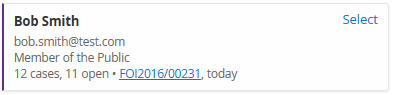
When you type in two or more of the Correspondent Details, the finding past correspondent function will automatically search eCase for matching details. These will appear in correspondent cards on the right side of the screen. The correspondent card will include the number of cases the correspondent has sent in, how many are open cases, along with a link to the last received case and the number of days, months or years since it was received. Review the details and if a correspondent card matches, click on the Select link.
If you have the postcode for the correspondent, enter the details in the Postcode field and the system will automatically respond with relevant addresses that you can choose from a drop down list.
BACK TO TOP
Create a New Case
To create a new case, click on the New Case button on the eCase menu, or via email (new.case@bis.ecase.gsi.gov.uk). If you send the email from your own eCase email address, the case will appear in your My Work tab.
Find out more…
How to manually create a case
How to create a case via email
BACK TO TOP
Digest emails

Find out more…
BACK TO TOP
Documents
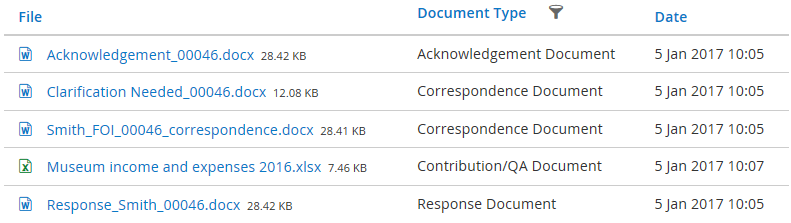
There is a new screen where all the case documents can be seen in one go. Any documents attached to contributions, quality assurances or emails sent into eCase to be attached to the case will also appear in Case Documents.
Find out more…
BACK TO TOP
Document Templates
If you have the Maintain Template Documents role on your user account, you will be able to create and maintain the document templates that are used for each case type.
To access Document Templates, go to the More menu and under the Settings section, click on the Document Templates link. The Document Templates screen appears where you can view your templates in alphabetical order. If you have multiple document templates, a search screen appears where you can narrow down the number of document templates that appear on your screen.
A new document category is available for creating Acknowledgement Documents. This is available for FOI case types.
To create an Auto Generated template, choose the Pro forma template option.
Click on the Show Mail Merge Fields to view what is available to add to the Document Template. When mail merge fields are used, the document must be uploaded in either Rich Text Format (RTF) or Open Document Format (ODF) files.
Find out more…
Document Templates
Add a Document Template
Modify a Document Template
Delete a Document Template
BACK TO TOP
Drag and Drop
It’s easy to add a document to a case with eCase, all you need to do is just drag and drop.
Wherever you have the option to attach a document, for example Attach new files… / Choose file…, you can drag and drop a document into eCase. The Drop files here option becomes available. Once the document is dropped, the Attach New Files pop up window will automatically appear for you to complete and attach the file to the case.
BACK TO TOP
Email on behalf of
When sending emails to a correspondent you can select who you would like to send the Email on Behalf Of. The 'email on behalf of' can be your email or one that has been set up on the email configuration screens, for example a teams email inbox. Both the Send Email "On Behalf Of" (Email) and Send Email "On Behalf Of" (Name) fields must be completed on the email configuration screens for the email to be available in the Email on Behalf Of field.
If there is no email set up in the email configuration screens, your user account email will be pre-populated in the Email on behalf of field.
This field is mandatory for:
- Acknowledging a case
- Requesting clarification
- Requesting a contribution
- Requesting a Quality Assurance (QA) of the case
- Sending a response email.
Find out more…
BACK TO TOP
Email Templates
If you have the Maintain Email Templates role on your user account, you will now be able to create and maintain all the email templates that are used for sending emails from eCase.
To access Email Templates, go to the More menu and under the Settings section, click on the Email Templates link. The Email Templates screen appears where you can select the Email Template Category. Once you select a category, the templates will appear. There are new templates that are available:
- Bulk Cases Assignment
- Case Assignment (was Acknowledgement Emails (FOI) in eCase2)
- Case Assignment Notification
- Case Response
- Case Watching Notification
- Clarification Needed
- Contribution requests – these are divided into different contribution requests:
- Internal Review (was FOI Internal Review in eCase2)
- ICO Appeal
- Information Tribunal
- Request for Draft
- Request for Information
- Transfer Out Requests
- FOI Allocation
- Quality Assurance
See Email Templates for descriptions and when to use these templates.
Click on the Show Mail Merge Fields to view what is available to add to the Email Template.
If there is more than one email template created per category, you have the option to set a Default template choice. The default email template will appear first, but can be changed to another template by using the Email Template field. To set the default template, the Default template choice tab becomes available. You can set a generic default template that can be used across the different case types, or can specify a different email template for each case type. Refer to Choose a default email template.
Find out more…
Add a new email template
Modify an email template
Deactivate an email template
Reactivate an email template
BACK TO TOP
Help menu
Help!!!
The online help feature is available in eCase3 by clicking on the Help link on the eCase menu. The help feature will be opened in a new internet window where you can search for topics you need help on.
Find out more…
http://www.ecase.co.uk/ecasehelp/
BACK TO TOP
Mandatory clearances
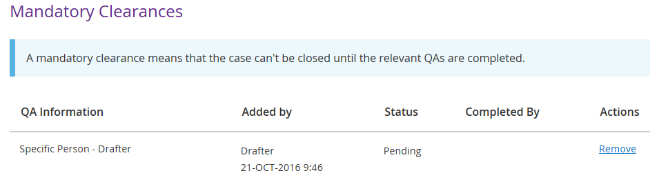
Would you like eCase to prevent the response from being sent, until the required clearances have been performed? If yes, then use Mandatory Clearances.
Mandatory Clearances can be set on a case at any point during the case process. You can specify who should be giving clearance for the response document prior to it being sent to the correspondent. For each mandatory clearance set, an associated quality assurance should be requested. Only once these quality assurances are accepted will the mandatory clearances be set to complete. eCase will then allow the response to be sent to the correspondent and the case can be closed.
Find out more…
Mandatory Clearances
Quality Assurance
BACK TO TOP
Ministers
You can now update Minister details and Ministerial Roles in eCase3. Ministers are used in eCase for Ministerial Correspondence and Parliamentary Question case types where correspondence is addressed to a minister or responded to by a minister. This new functionality will allow you to:
- Add a Ministerial Role
- Change a Minister attached to a Ministerial Role
- Delete a Ministerial Role
- Create a Minister
- Modify a Ministers details
To access Ministers, go to the More menu, then the Reference section and click on the Ministers link.
To edit Private Office team members, click on the Ministerial Role on the left menu, and then click on the Edit Private Office Team link. Refer to the Edit Private Office teams section.
Find out more…
BACK TO TOP
Quality Assurance (QA)
To send a QA request, go to the Contributions/QA link on the left menu. You have two buttons that can be used:
- New Quality Assurance Request – an email can be sent directly to the person you would like to quality check the response. If the standard QA email template is used, the mail merge fields of [[QA_APPROVE_HYPERLINK]] and [[QA_REJECT_HYPERLINK]] will be available to the user on their email. These links will allow the user to accept or reject the QA directly from their email. No need to reply to all on the email. The response will be logged on the QA record.
If the user has an account on eCase, they will also be able to respond to this QA via their Workbasket.
If the user does not have an account on eCase, type their email address in the Recipients field. Select their email from the green Email to field.
NOTE Certain mail merge links will not be available if a user does not have an account on eCase, for example a link to access the case [[CASE_HYPERINK]]. When you go to preview the email, eCase will highlight which links are not available so that you can amend the email.
You have three buttons that are available on the QA record:- Chase response – re-send the QA email to chase the response.
- Enter response yourself – enter the response outcome yourself.
- Close without response – close the QA request without a response.
- New Record-only Quality Assurance – can be used when you want to record that a QA has taken place, but you do not want to send an email.
When sending an email request, the process has changed so that you preview the email prior to sending the email out.
If you would like to set up restrictions so that the response must be quality checked by certain team members prior to the response being sent out, you can set Mandatory Clearances on the case. A QA must be requested, and approved, for each of the Mandatory Clearances set on the case before the response document can be sent out via eCase.
BACK TO TOP
Saved searches
Do you often search for the same information on eCase? With eCase3 you now have the ability to choose your search criteria, save your search for future use and set a default search so that the search criteria will be entered when you go into the Case Search screen.
Find out more…
Choose fields
Save a search and make it my default search
View a saved search
Modify a saved search
BACK TO TOP
Standard Lines Management
When viewing, or maintaining the list of Standard Lines, you can now view all your standard lines instantly rather than having to search for them. They appear in alphabetical order. If there are more than 25 Standard Lines, a filter will appear.
Find out more…
BACK TO TOP
Subjects
Subjects represent the main policy area that a case is about and they are used for all case types apart from FOI cases. Subjects work differently to eCase 2. They are no longer limited to specific teams, and can be chosen independently of the team that the case is assigned to. This is useful in situations where policy areas are spread across multiple teams, or the entire department.
When a Subject is selected, if one team is associated to the Subject, it will prepopulate the Team field automatically. If there are multiple teams associated to the Subject, a message appears below the Subject field with the teams associated to it.

NOTE Hover over the hyperlink to see the full name of the team.
To choose a team associated to the subject, click on the team hyperlink, or click on the Team drop down arrow to see all the teams in the organisation structure.
To create a new Subject, assign a team to a Subject, see how many cases are associated with that Subject and delete a Subject, you will need the Case Subject role on your user account. The Subjects section is located under the More menu, then the Settings area.
TIP Use the Case Search screen, Subject field, to identify cases that are using a specific subject. Archived subjects will appear in the drop down if cases were using that subject.
BACK TO TOP
Transfer Out
The process for transferring out a case has changed. The Correspondence teams will no longer be able to change the Case Type to Transfer Out. Instead, follow the steps below:
- On the Case Details screen, scroll down to the Response Type field.
- Click on the Edit link
- In the Change Response Type pop up window, enter information in the Case Note field as to why the case is to be transferred out.
- Click on the Change Response Type button. The case will move to the Transfer Out teams Workbasket and will appear in the Transfer Out tab.
NOTE Anyone with the PQ Transfer Out Coordinator or Correspondence Transfer Out Coordinator role assigned to their user account will see the Transfer Out tab.
BACK TO TOP
Transfer Out team
Log into eCase:
- In your My Work tab, you will see the cases that have been sent to the Transfer Out team. Everyone in the team will see the case with the Actions of Manage and Dismiss. If you are not dealing with the transfer, click on the Dismiss link. This will remove the case from your My Work tab.

NOTE You will still be able to view and manage the transfer via the Transfer Out tab. - Click on the Manage link.
- Click on the Contributions/QA link
- Click on the New Contribution Request button and select the Transfer Out contribution Type.
- Enter the contribution details and send the email.
BACK TO TOP
Transfer In
When a case is requested to be transferred to the department, a new button becomes available.
Create the case, and on the Case Details screen, place a tick in the Transferred in from OGD checkbox and select the Department of where the case has come from. If known, enter in the Addressee Minister from the Other Government Department (OGD).
Once the Transferred in from OGD checkbox has been ticked, the Allocate (Transfer In) button becomes available on the Create Case tool bar.
Click on the Allocate (Transfer In) button to send the case to the Transfer in team. Anyone with the PQ Transfer In Coordinator or Correspondence Transfer In Coordinator role on their user account will then see the case in a new tab called Transfer In.

Any new transferred in case will have two Actions – View Case and Take Ownership. When you
click on the
Take Ownership link,
you will become the owner of the case and your name will appear in the
Assignee column. At this stage, the Actions link will change
to say
Manage. Other people in the team will no longer be
able to see the case in the
Transfer In
tab.
BACK TO TOP
Watching cases

You can now allocate yourself as a watcher on a case, allowing you to follow the progress of cases that are of interest to you, even when you are not the case owner. You can choose to show the cases on a Watching Cases tab on your Workbasket, or to receive email notifications as the case progresses. If you are the case owner, you can also add other users as watchers.
Find out more…
BACK TO TOP
Workbasket Tabs
The Workbasket is your home page. It is now grouped into tabs which contain cases of similar activities. Depending on the roles you have assigned to your user account, you will see one or more tabs in your Workbasket. The My Work tab is where you will find cases that you are working on.
Find out more…
BACK TO TOP
User Maintenance
The User Maintenance section will allow you to maintain user accounts on eCase. If you have the User Maintenance role on your user account, you will be able to see the User Maintenance link on eCase under the More menu, then Management section.
You can search eCase accounts using a variety of search criteria, for example:
- Account Status
- View Blocked / Suspended accounts
- Cancelled
- Active
- New
- Forename
- Surname
- Email Address
- Organisation Group